Friday 30 March 2007

Epoxy—dangerous side-effects. Part 1, The Haircut


I like to think I’m careful when using epoxy. But what with the stress of a pot of mixed resin suddenly curing, the sweating caused by all the protective gear and the gas mask I unthinkingly scratched my head with a sticky, gloved hand. The result, I found out while cleaning up later, was a dice-sized lump of wood welded to my locks. I tugged at it but quickly realized that it was scissor job. I cut it out and found that it left such a dent in my hair that there seemed nothing for it but to get the lot chopped.

I chose a bright, light salon with white clad girls busily working on heads of hair. I asked for a short cut and pointed to the dent and a young girl led me straight to the hair-washing sinks. It was only when sitting with my head back, waiting for her to start that I noticed a sign declaring, ‘Hairdressing school, please bear in mind that we are learning.’ Then I saw that the heads being busily worked on by the other girls were dummies. I was the only live customer. I rose to bolt just as the girl opened the tap and filled my right ear with freezing water. Before I could recover she adjusted the temperature and filled the left ear with boiling water. Then, for good measure, she dropped a glob of shampoo on my forehead that slowly ran down to my eye. By the time she’d finished lacerating my scalp with her long nails my ears were so full of water that I could hear whale songs. In an aquatic world I was led to a chair. I sat down just as she trod on the height adjuster pedal. The chair shot to the floor.

I looked at my forehead in the mirror. Then she started to pump the pedal and the chair rose up. My face came into view, my shoulders and torso but the chair would go no higher for my knees were trapped under a shelf. ‘Stop!’ I must have shouted though to me the voice was no more than a faraway watery echo. ‘aytechodaño’ she chirped from a distance and pressed the pedal that sent me whizzing to the ground. She pumped me up again and started to comb my hair, then she combed it some more, and a bit more, and then she combed the front. Satisfied, she looked at me as if to ask, ‘Is that to your liking, sir?’

I could see that the fundamental concepts of hairdressing were bizarrely foreign to this school. I asked her to cut it shorter please, half its present length, or as short as that spiky tuft on my crown. She combed the sides. The comb banging on my ears interfered with the whale song. I wasn’t getting my ideas across. Maybe they only taught as far as combing. Or was it the language? ‘Más corto,’ (shorter) Well that was Spanish alright, but it didn’t make any difference. I tried again in Catalan, this time with a please, “Més curt, si us plau.” She gave me a look that said, “My scissors don’t do that sir.” And she was right. Tightly gripping a lock of my hair and the scissors between the fingers of her left hand and with the comb held in the other the transference of the tools of her trade to her right hand required more co-ordination than she could bring to bear and the scissors clattered to the floor. Thankfully she had to let go of my hair to retrieve them and when she stood up she went back to her comfort zone—combing.

The scissors did eventually make contact with my hair and the result was probably slightly worse than what I could have achieved myself.

Me, yesterday.

More on epoxy another day.

Thursday 29 March 2007

A rose by any other name…


Now that the Trow exists as a 3d structure it seems unfair to continue referring to the boat with the impersonal ‘it’ or ‘my Trow’. The hull is a physical presence in the garden. What were six unwieldy sheets of plywood 3 months ago now compose a form of jaw-dropping harmony. (Excuse the purpling of my prose, I’m bewitched.) And the fine-lined expression of beauty demands a name and a gender. So here goes, the official online baptism. Onawind Blue.

Onawind Blue has the distinction of being one of the most pleasing fixed forms that it has been my pleasure to ogle. Her hull, though still not faired, has surprise moments of unqualified beauty. There's the sweetest hint of flare on the bilge chine just at the shoulder where the bows open to the beam. Such traces of modest grace are almost impossible for the camera to capture; they are the elusive inhabitants of the third dimension that wink at us only in moments of fortuitous alignment. And when they wink it’s like (I’m afraid I can’t find a pc way to express this.) a chance view of the perfect cleavage, that leaves your eyes wide and your pupils unnaturally dilated.

Then there’s the line of the sole rocker that blossoms into the even spread of the stern. Again beyond the capacity of the camera’s lens. It’s a gentle transition that’s so natural, so stylish it’s like (ehem, I’ll try and do better than with the previous simile.) the elegant unfolding of a leaf as it reveals a mature form.

This boat’s going to be a head-turner alright and I’ll bet she’ll set many a lubber with the gleam of the sea in their eye to dreaming.

(Well that was all rather over the top, Onawind Blue seems to have loosened what little grip I had on the legendary British reserve.)

Friday 23 March 2007

Playing Truant

While shirking parental duties, work commitments and favours to friends I filled and taped the exterior seams.

Tuesday 20 March 2007

Other Designs part 2. Jim Michalak


Having studied a few of Phil Bolger’s boats I moved on to designs by Jim Michalak, attracted at first by the title of his book; Boat Building for Beginners and Beyond—It sounded like exactly what I needed.

Jim Michalak is an aerospace engineer turned marine architect whose focus is on small functional craft, which are easy to build. Michalak knows his stuff and the synthesis of his depth of knowledge can be found in his straightforward designs. The trade-off is a stark functionality that doesn’t pander to the traditional nautical tenets of beauty, but his attitude is appealing; building should be simple, easy and fun, that important goal of being on the water should be within reach of everyone. His boats feature exterior chine logs, leeboards, walkthrough ‘birdwatcher’ cabins and politarp sails.

The first of his boats that interested me was Mayfly 14 . Inside the length that I was looking for and with construction detailed in the book she looked like an excellent first boat. With her balanced lugsail she makes for satisfying pottering on sheltered waters.

The next design that caught my eye was his AF3, a 16ft by 5ft cuddy sharpie, it was boxy but looked seaworthy and the cuddy would be a boon. There are several AF3 builds documented on the Internet and Michalak’s plans are detailed so construction seemed simple. The boat that I would build in the parallel universe where I only build boats would be his Frolic 2 . Long and lean at 20ft by 5ft and designed for rough water, it also rows well in calm conditions.

I find his birdwatcher cabined boats fascinating, the entire crew ride inside sitting on the floor and looking out of Plexiglas windows. This gives a low centre of gravity, which combined with high straight sides makes the boats almost uncapsizable. Good examples are Harmonica and Jewelbox.

Though I’m not building one of his designs I’ve taken the book Boatbuilding for Beginners and Beyond as my construction bible, and bear much of his sound advice in mind. Sound advice is a rare commodity around here. His MARK CENTRELINES BOLDLY has become a bit of a mantra about the garden, though I prefer a split infinitive version à la Jim Kirk and say ‘to boldly mark centrelines’. It’s become a little nonsense that makes me smile. Such are the fatuous ways of the workshop. And when it comes to sighting the hull for overall symmetry those boldly marked lines are a godsend.

Apart from the copper bottomed boating know-how the book has also given me the plans for my oars, the design for hanging the rudder and the low down on how to make a balanced lug sail from politarp.

Jim Michalak publishes a fortnightly newsletter on the internet. In this issue Jim’s been running Mayfly 12 through the Hullform software to determine the fastest trim. The program has delivered some interesting results.

Monday 19 March 2007

The Gluing Begins

Our old friend the Mestral wind turned up in a feisty mood this morning. Charging round the garden like a frisky puppy begging to play, it wasn’t going to let me start gluing the interior seams as I had planned. Hoping it would calm down a bit after lunch I got on with installing the centreboard case.

But first I had to cut the slot in the sole. There’s something about cutting a hole in the floor of your boat that goes against the grain. Rationally you know it has to be, but there’s an irrational part that says to be sawing holes in the sole is just asking for trouble. The psychological impact of holing the boat had me erring on the side of caution. When it comes to cutting wood there’s the expression, ‘You can always take more off but you can’t put more on.’ But the real trick is to get it right first time. Having backed myself into caution’s cosy corner I had a hell of a job clawing back out and loping off the 2mm that was left. In the end I got the jigsaw out again and took off slightly too much.

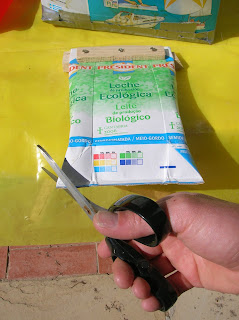
Even though the wind was still boisterous I found a sheltered spot and got going with the glue. I had planned to pipe thickened epoxy into the seams using empty milk cartons. I’ve been saving cartons and yogurt pots for the past 3 months and the family’s fair sick of them teetering on bookshelves and cascading out of cupboards. Today would be their day. By cutting off one end, mixing the epoxy and thickener in the carton, then sealing the top and cutting off a small bottom corner I’d have a cool tool for applying filet. It seemed fool proof enough but it must have been very hot in there. The first ¼ pint batch went off in under 10 minutes and I was left with a solid carton in my hands. I went back to mixing small amounts in yogurt pots and applying filet with a selection of cutlery. Here's a taped seam.

And this is Joaquim. One of the few fishing boats still working out of the local port. Nobody catches much these days but Joaquim, run by a pair of burly brothers, is out most days looking for the Mediterranean’s last sardine. Today they were probably hoping to get their fishing done before the wind picked up big time. The Mestral, being an off-shore wind on this part of the coast doesn’t kick up too much chop near the beach, so fishing boats that get caught out by the wind sail as close in as they dare. Joaquim could still afford to come in 30 metres or so, but the brothers are probably howling and hooting and having a high old time with all that spray flying about.

Sunday 18 March 2007

Other designs part 1. Phil Bolger.


Before the decision to build the Light Trow became irreversibly cemented in my mind, I’d spent several months looking at other designs. I saw plenty of good boats, many with the advantages that come with bought plans and a history of successful builds.

Here are some of them.

Like many before me I started by looking at Phil Bolger’s designs. I don’t have the stamina to try to do justice to Bolger here, widely considered a genius and with over 700 published boat plans he’s just too large a subject.

To my mind his brilliance lies in his ability to confront each new design challenge with a total objectivity that allows him to shrug off cumbersome allegiances to design traditions and nautical aesthetics. This ‘out of the box’ thinking has produced some truly revolutionary and, it has to be said, boxy boats.

The Bolger Brick, as the name implies, is one such open box with an offset mast stepped on the front corner of the bow and a leeboard. It was the first Bolger boat that I came across and although it didn’t appeal to me I was fascinated by the attitude behind it. Here was a design that simply said, get out on the water and have fun regardless of the depth of your pocket, your nautical experience, or what other people think. I found this vision refreshing and far removed from the prevalent attitudes of the western Mediterranean.

Much of Bolger’s work of the early 80’s explored the possibilities of the tack and tape or stitch and glue method that resulted in the book Instant Boats by Harold ‘Dynamite’ Payson. Payson had built all the boats featured in the book and had wrung out any flaws. In 1984 a second book was published, Build the New Instant Boats, which featured, along with detailed instructions for her construction, the nifty, slick-looking 15ft Gypsy. With an off-centre centreboard, a neat inboard oar storage arrangement and a triangular spritsail that would propel her slim hull swiftly over sheltered waters she seemed ideal for a first boat. But she wasn’t screaming “I’m your boat!” and, being undecked didn’t suit my sailing area.

Windsprint is another design featured in the New Instant Boats. Similar to Gypsy in length but radical in having no frames, being double ended and having the centreboard so far off-centre as to make it more of an inboard leeboard. The secret to the boat’s rigidity, given the lack of frames, lies in the triple thickness gunnels, which provide all the required stiffness.

Windsprint’s unusual hull was the result of a Bolger experiment. The idea was for a sailing catamaran with an aft stepped sail and a rudder hung on the bows. The experimental craft didn’t fulfil the designer’s expectations but the single hull obviously worked and as Harold Payson had made one he persuaded Bolger to design a rig for her. Windsprint is a pretty boat and, with a large open cockpit, great for lounging on the waves, but with no deck and no built-in buoyancy again not especially suitable.

So while it seems that for the time being I’m not building a Bolger design, I still enjoy poring over his plans. One that particularly fires my imagination is the Light Schooner or Scooner. At 23ft long by 6ft wide and flying a massive, 266 sq ft of canvas on a low rig this boat whistles along off the wind at over 12 knots. To windward it’s neither so effective nor so fast but the trade off is almost certainly worth it for the white-knuckle adrenaline ride of downwind sailing.

Thursday 15 March 2007

Trow Roll

I had been rather worried that the boat was going to have a corkscrew stern. However I put it together—clamping every which way, screws here and there, ratchet strap and cable ties, the transom would twist up at one corner and sneer at me. Local advice ranged from hitting it with a hammer to hanging it from a tree. I was just getting disheartened when the designer stepped in with some timely encouragement that got me in the workshop forcing the upper chines into position. Amid the creaking and the groaning, I secured them with cable ties, then stood back and lo, the boat was straight. What a relief. My chief eyeballer deemed it still out a tad but I was satisfied and, keen to ride the wave, went on to fit the sole. But first I had to turn the boat.

Now this garden is communal and although most of the houses are holiday homes more often than not there’s some bod about, some purveyor of dodgy advice, lurking round my bench. Today, just when Vitalstatistix or Unhygenix would have come in handy the place was deserted. Like policemen they disappear on the rare occasion that you actually need them. So I did it myself and it wasn’t that difficult.

I clamped trestles to bulkheads 1 and 3, took a deep breath and, uttering the war cry ‘Allez op!’ heaved the boat onto its beam, then scuttled round to the other side and pulled it over on top of me, tortoise style. Then it was just a question of setting it down gently. I wouldn’t recommend this method for back sufferers but for me it sufficed.

The sole had only been roughly cut which was fortunate as its lines didn’t coincide with the bottom shape. Later I wondered that the stern of the sole might have been on the bows of the boat. But in no mood for more worrying I simply marked out the sole from underneath using the hull as a stencil, cut and gave it a bevel with the circular saw and fixed it to the bilge chines with packing tape. The tape, as well as keeping the sole in place, will hold in the resin when I epoxy the interior seams.

And that’s it, we have our shape. Now I’ve got to take measurements for frame 7, make and fit it. And then the gluing begins.


Straight at last.
Ready to roll.

Tuesday 13 March 2007

But is it Art?


Placed in the centre of the garden with a steady stream of viewers circling, commenting and asking questions the Trow is looking more like an art installation than a humble boat-building project.

Trow Art, I should explain, investigates the artist’s reasons for eschewing advice that others have gleaned from hard-learnt lessons, for diving, blind-fold, into the deep end where his rudimentary skills and scant experience provide less than adequate buoyancy. For taking snap decisions and sticking to them even when evidence of their shaky foundations is abundant. For continually failing to measure more than once and for never putting tools back in the same place twice. Trow Art also looks at the disappearance of pencils, notebooks and tape measures and the savage dances of death that their loss provokes.

As the work progresses we witness the transformation of the artist, once smooth browed he now has an array of over-developed muscles rippling across his forehead, a black cloud is discernible over his head and he scares the unwary with spontaneous out-pourings of fierce, firecracker words.

Trow Art asks the viewer to explore the forms of pipe dreams and reflect on symbols of freedom in the 21st century, raising questions about the sanity of those who give priority to their cause even over family, health and money and the place of such individuals in society.

Trow Art is an installation that examines the human spirit caught between its dreams and its abilities and forced to come to terms with its nature.

It is not a pretty sight.

Friday 9 March 2007

Sheer joy


Ok the upper chine isn’t exactly in place but you get the idea, well at least I do. The tent structure gives it an air of a Viking death boat, suitable for transporting the mother in law’s shit bilonga faia as ashes are colourfully rendered in Pidgin.

Wednesday 7 March 2007

Wetted area

For a country living a period of extended drought there was plenty of rain today.

The transom went on with the help of a ratchet strap. I hope to find more opportunities for using one as it was satisfyingly decisive in bringing the panels together.

It was time to dry fit the upper chines and get a first peek at the sheer. That was what I hoped for but sheets of rain came billowing through chased by a chill wind whose angry gusts tugged at the chines and made fitting them awkward. As more rain came down, now of the icy, marble-size drop variety I embarked on the task of somehow covering the boat with a plastic sheet. It was probably quite amusing to watch but I won’t go into details.

When the clouds passed I had another go with the upper chine. Getting it into place with clamps seemed like a one and a half man job. With the help of sticks, feet and elbows I managed to wrestle it to within a few cms of its position but it became clear that only by stitching the upper chine to the lower one will I really get it to sit true. The difficulty with stitching will be in working around, or through, the bulky inwale. Also evident after a couple of dousings is the need for a boat cover of some sort, a ridged one would be handy if the winter drought really has finished.

Tuesday 6 March 2007

Goodbye to the blue devils.


A week away from the project brought a dose of doubts and worries and a couple of downbeat posts which didn’t make it past the editor—I’d hate to give the impression that the Invisible Workshop isn’t a constant round of fun and games.

Back in the fray today putting the boat together piece by piece. I had expected a bit of a tussle with the inwales and although the panels were more to difficult assemble than without, she went together with no more than a few creaks and groans, which I took for signs of pleasure more than complaint. Any complaining came from the builder who in his hurry to get started had forgone footwear. Clamps that popped off the straining timber unfailingly chose to land on my toes.

Here’s the day’s crop of photos.


She has gone together very well on just the stem and the three bulkheads. The intermediate frames will go in when the hull shape is squared and fixed. I’ve bevelled the bulkheads by eye as needed and in some cases I’ve been overzealous and in another I’ve created a peculiar rolling bevel, which will take a deal of epoxy to fill. I finished by making some large ‘outtie’ bevels for the transom which will go on first thing tomorrow.

So infected was I with the heady satisfaction of a good day in the workshop that I later drove away with a cup of tea on the roof of the car. The cup made it to the first roundabout where it dumped its load of Earl Grey down the rear window before launching itself in a suicidal arc onto the tarmac.